
If you are an instructor, please feel free to share this article with your students as an “instruction manual” on how to use the student portal.
Welcome to Mentorica.AI! This article will walk you through how to use the student portal to interact with DAB, our AI agents, to support your learning experiences.
Getting Access
Please navigate to dab.bot and enter your email address. Please make sure to enter the email address you intend to use with Mentorica – this is often your University email address, or a work / personal email address that you have indicated to your instructor as your preferred credential.
- If you are accessing the portal for the first time: you will be prompted to set up your password;
- For all other logins: please use the same email address and password to sign in.
Student Portal Layout
The student portal has the following key components:
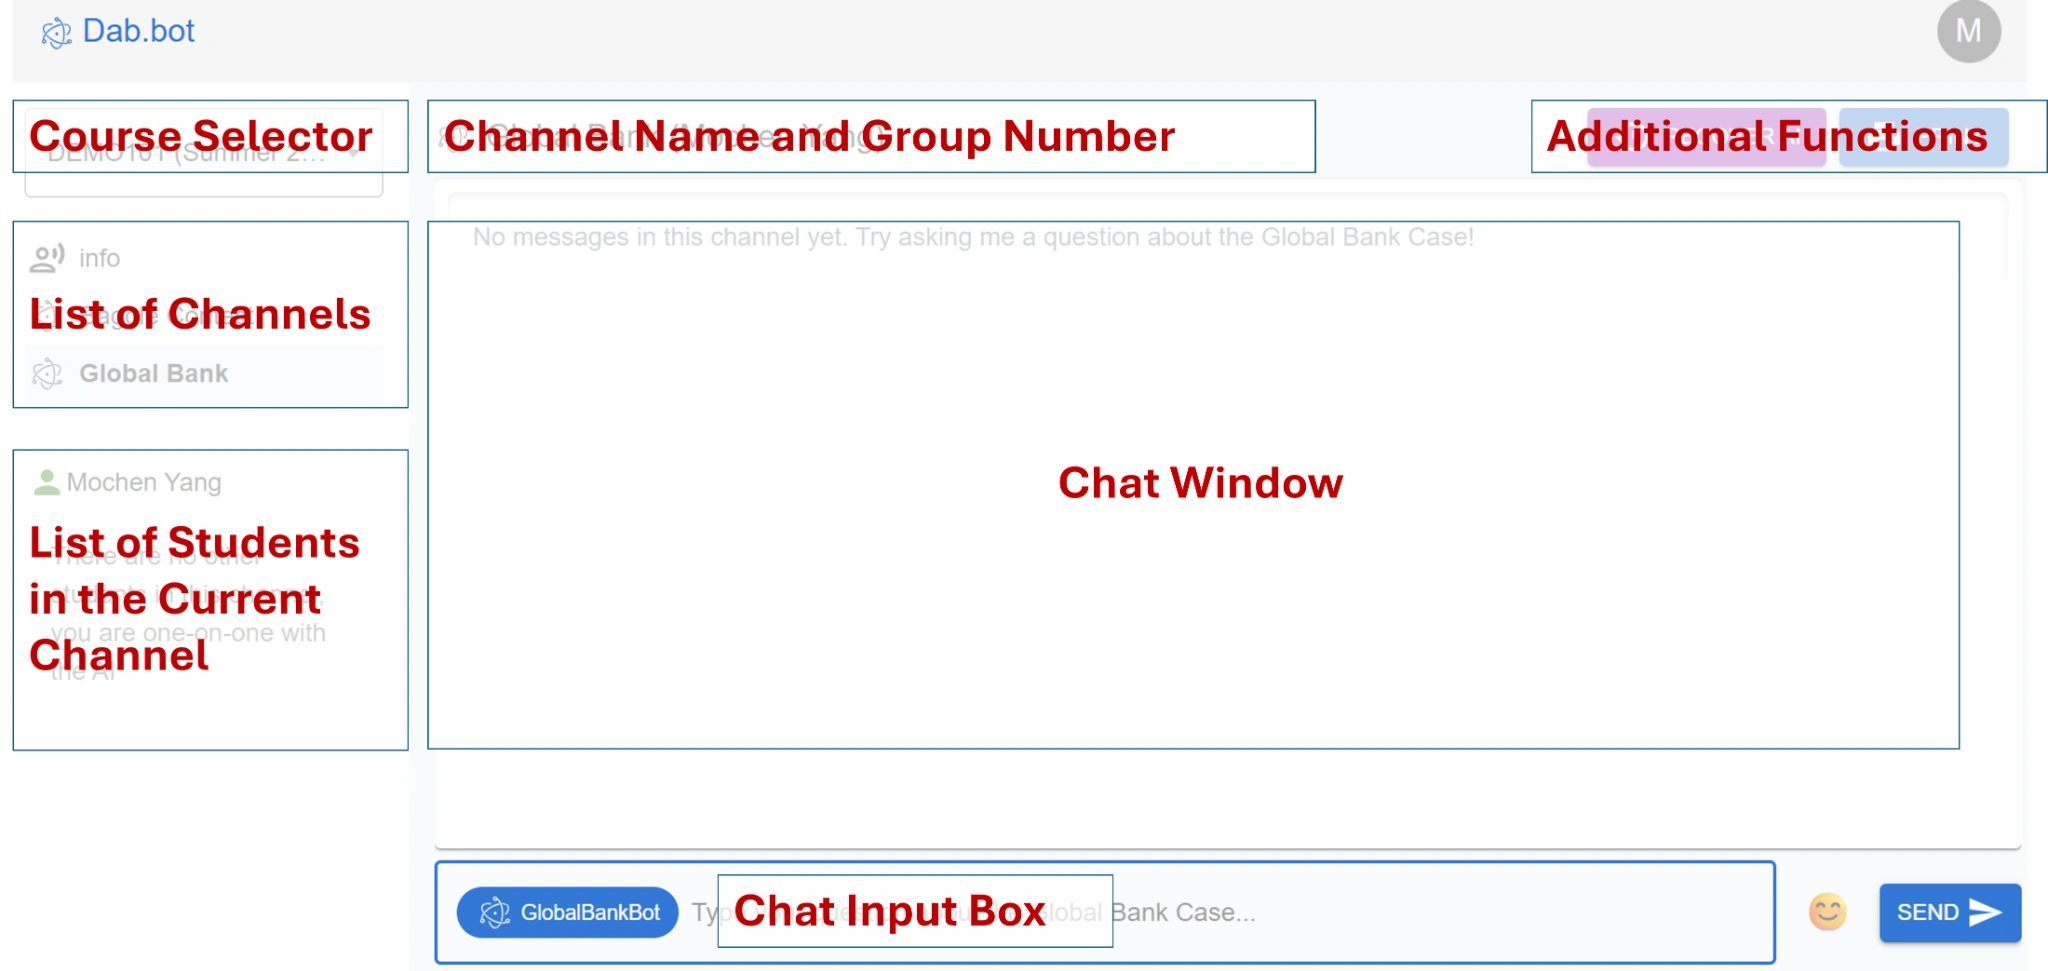
- Course selector (dropdown menu on the top right corner) allows you to switch between different courses that are using Mentorica;
- Channel List: choose a channel from the list of channels to start chatting. Different channels are created by your instructor for different purposes. For example:
- The “Info” channel is typically used as a common place for the instructor to send announcements. The “Info” channel does not have AI agents.
- You may have one or more AI activity channels where you can interact with AI agents specifically designed to provide support for different activities / cases. For instance, if you (either individually or as a member of a team) are working on a case called “Global Bank”, then you will see a channel named “Global Bank”, where you can interact with an AI agent designed for the Global Bank case.
- If an AI activity channel is set up to be used by a team, then the name of all team members will show up on the left. If you do not see this, it means you are the only student in the channel.
Chat
To send a message, type it in the chat input box and hit “Send” or Enter on your board. In a group channel with both an AI agent and other students, you can send a message either to the AI agent or to other students, by toggling the AI agent card at the left end of the chat input box. Specifically,
- By default, a message you send will be directed to the AI agent, and the AI agent will respond to your message.
- If you want to send a message only to the other students in the channel, click on the AI agent card to “mute” the AI agent. Then, the agent will not respond to your message. However, the agent will still be aware of your message. In subsequent messages with the agent toggled on, the agent will be able to refer back to conversations you have had with other students.
Additional Functions
The student portal provides a few other useful functions for learning and interacting with the AI.
- The info icon (🛈) (right next to channel name): click on it to access case learning objective, as well as downloadable case description and supplemental materials (e.g., the dataset associated with the case).
- The “Recover AI” button (top right corner): sometimes, the AI agent might get “stuck” on a request due to glitches in OpenAI’s service. For example, the AI agent may tell you that “it has lost access to the data or coding environment” or even ask you to “upload the data files” (which you do not need to do). We have already implemented automatic recovery mechanisms to reduce disruptions to your learning experiences. In rare instances when automatic recovery does not address the problem, you can click this button to issue a manual recovery. This will reset the underlying OpenAI Assistant, re-install required data files and re-implant the memory of this conversation.
- The “Print” button (top right corner) will export all the historical messages in the current channel into a PDF file. This allow you to save your conversations with the AI.